
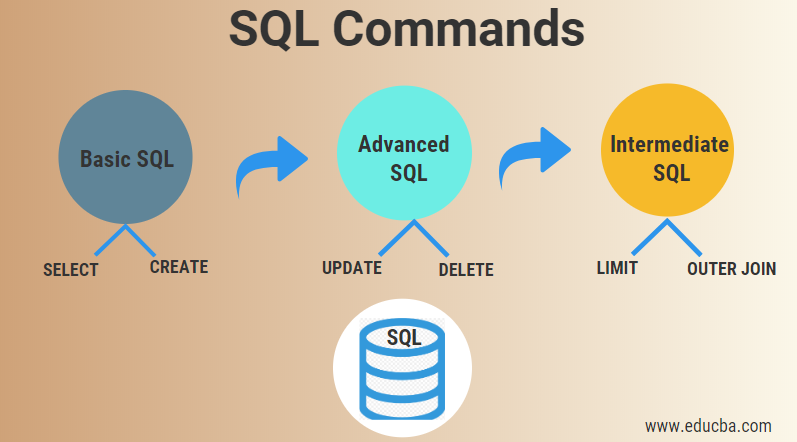

I. Introduction to SQL
What is SQL?
SQL stands for Structured Query Language, and it is a programming language used for managing and manipulating relational databases. It is widely used in the field of data management and is considered the standard language for interacting with databases. SQL allows users to retrieve, insert, update, and delete data from databases by using specific commands.
SQL is divided into several categories, including Data Definition Language (DDL), Data Manipulation Language (DML), Data Control Language (DCL), and Transaction Control Language (TCL). Each category consists of a set of commands that perform different tasks in database management.
Some of the most commonly used SQL commands include:
SELECT: Retrieves data from a database table based on specified conditions.
INSERT: Inserts new data into a database table.
UPDATE: Modifies existing data in a database table.DELETE: Deletes data from a database table.CREATE: Creates a new database table, view, or other database objects.ALTER: Modifies the structure of a database table.DROP: Deletes a database table or other database objects.GRANT: Grants permissions to users to perform specific actions on a database.REVOKE: Revokes permissions from users to perform specific actions on a database.
These commands are just the tip of the iceberg when it comes to SQL. Learning SQL is essential for anyone working with databases or aspiring to become a data professional. With SQL, you can efficiently manage data, generate reports, analyze trends, and make informed business decisions.
For a comprehensive guide to SQL commands and their usage, you can refer to the SQL Wikipedia page.
 Source: www.sqlshack.com
II. SELECT Statement
Basic syntax of the SELECT statement
The SELECT statement is one of the fundamental SQL commands used to retrieve data from a database table. The basic syntax of the SELECT statement is as follows:
SELECT column1, column2, ...FROM table_name;This syntax specifies the columns that you want to select from the table. You can specify multiple columns separated by commas, or you can use an asterisk (*) to select all columns in the table. The FROM clause specifies the table from which you want to retrieve the data.
Using the SELECT statement to retrieve data from a table
To retrieve data from a table using the SELECT statement, you need to specify the columns you want to select and the table from which you want to retrieve the data. For example, to retrieve all columns from a table called Customers, you can use the following query:
SELECT *FROM Customers;This query retrieves all rows and all columns from the Customers table.
Filtering data using the WHERE clause
The WHERE clause is used to filter data based on a specified condition. It allows you to retrieve only the rows that satisfy the condition specified in the clause. For example, to retrieve all customers from a table called Customers who are from the United States, you can use the following query:
SELECT *FROM CustomersWHERE Country = 'United States';This query retrieves all rows and all columns from the Customers table where the value in the Country column is ‘United States’.
The SELECT statement is a powerful tool in SQL that allows you to retrieve data from a table and apply various filters using the WHERE clause. Understanding and mastering the SELECT statement is essential for any beginner learning SQL.
 Source: i.ytimg.com
III. INSERT Statement
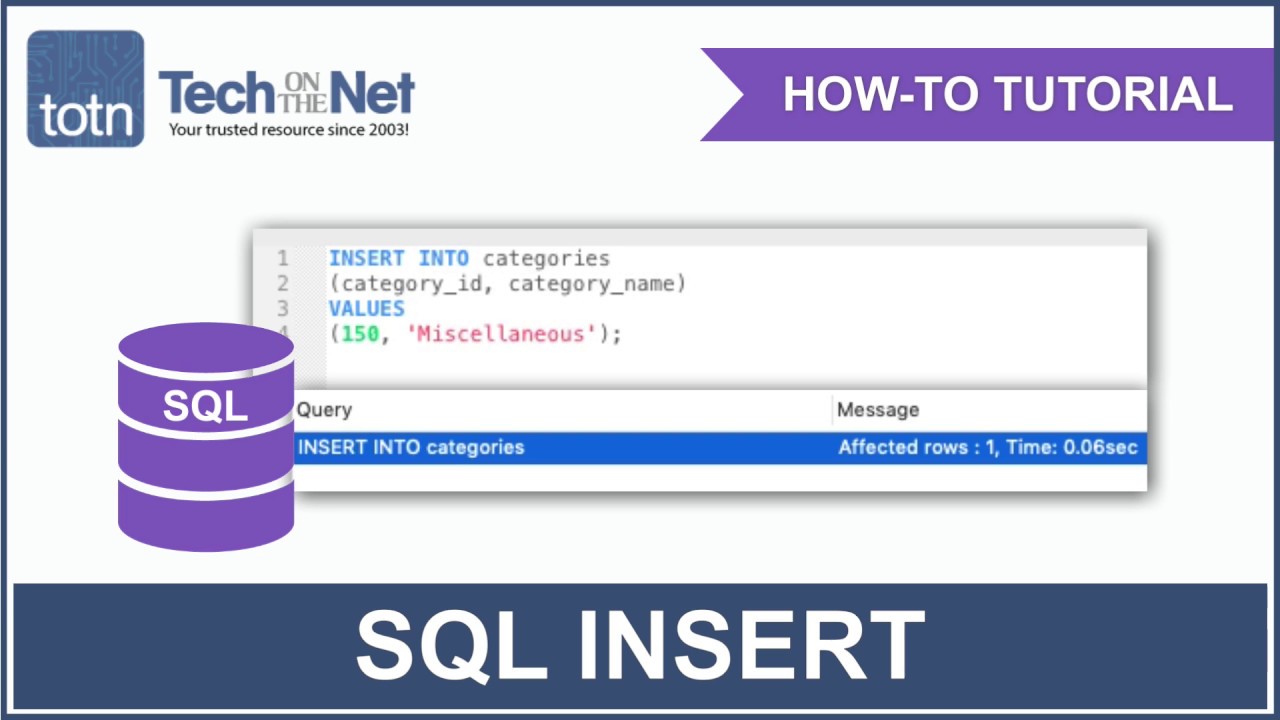
Adding new records to a table using the INSERT statement
In SQL, the INSERT statement is used to add new records to a table. It allows you to insert data into specific columns or all columns of a table. Here’s the basic syntax of the INSERT statement:
INSERT INTO table_name (column1, column2, ...)VALUES (value1, value2, ...);For example, to insert a new record into a table called “customers” with columns “name” and “email”, you can use the following command:
INSERT INTO customers (name, email)VALUES ('John Doe', '[email protected]');This will add a new record with the name “John Doe” and email “[email protected]” into the “customers” table.
Specifying column values in the INSERT statement
If you want to insert data into specific columns of a table, you can specify the column names in the INSERT statement. Here’s an example:
INSERT INTO customers (name, email)VALUES ('Jane Smith', '[email protected]');This will add a new record with the name “Jane Smith” and email “[email protected]” into the “customers” table.
Inserting multiple records at once
You can also insert multiple records into a table using a single INSERT statement. To do this, you can specify multiple sets of values in the VALUES clause, separated by commas. Here’s an example:
INSERT INTO customers (name, email)VALUES ('Alice Johnson', '[email protected]'), ('Bob Davis', '[email protected]'), ('Sarah Wilson', '[email protected]');This will insert three new records into the “customers” table with the specified names and emails.
The INSERT statement is a powerful tool in SQL that allows you to add new records to a table. Whether you need to insert data into specific columns or multiple records at once, the INSERT statement can help you efficiently manage your database.
 Source: 365datascience.com
IV. UPDATE Statement
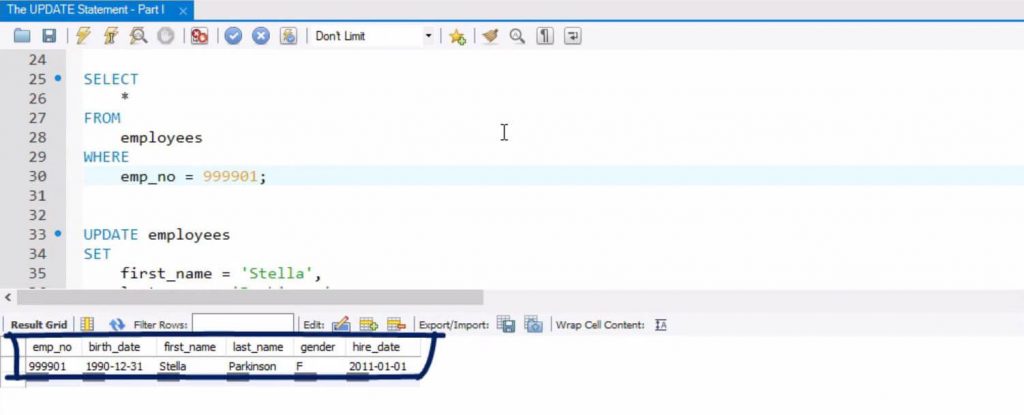
The UPDATE statement in SQL allows you to modify existing data in a table. With this powerful command, you can change values in specific columns of a table, update multiple records at once, and apply conditions to determine which records should be updated.
To update data using the UPDATE statement, you need to specify the table name and use the SET clause to define the new values for the desired columns. Here’s an example:
UPDATE table_nameSET column1 = value1, column2 = value2WHERE condition;The SET clause is used to specify the column(s) and their new values. You can update multiple columns by separating them with commas.
The WHERE clause is optional but highly useful when you want to update specific records based on certain conditions. For example, if you want to update the price of products that belong to a specific category, you can use a condition like this:
UPDATE productsSET price = 100WHERE category = 'Electronics';This query will update the price of all products in the “Electronics” category to 100.
The UPDATE statement is a fundamental command in SQL that allows you to modify data in your tables. By understanding how to use this statement effectively, you can efficiently update and manage your database records.
 Source: 365datascience.com
V. DELETE Statement
Removing records from a table using the DELETE statement
The DELETE statement is used in SQL to remove records from a table. It allows you to specify the criteria for deleting specific rows or remove all rows from a table. Here’s how to use the DELETE statement:
Syntax:
DELETE FROM table_nameWHERE condition;- DELETE FROM: This specifies the table from which you want to delete records.
- WHERE: This is an optional clause that specifies the condition that a row must meet in order to be deleted. If you omit this clause, all rows in the table will be deleted.
It’s important to exercise caution when using the DELETE statement, as it permanently removes data from a table. Always double-check your conditions before running a DELETE statement to avoid accidentally deleting important data.
For more information and examples, you can refer to the SQL Wikipedia page.
 Source: cdn.educba.com
VI. JOIN Statement
Combining data from multiple tables using the JOIN statement
One of the most powerful features of SQL is the ability to combine data from multiple tables using the JOIN statement. The JOIN statement allows you to create a connection between two or more tables based on a common column. This enables you to retrieve data from multiple tables in a single query.
To use the JOIN statement, you need to specify the tables you want to join and the columns that connect them. The most common type of JOIN is the INNER JOIN, which returns only the rows that have matching values in both tables. However, there are other types of joins that you can use depending on your specific requirements:
- INNER JOIN: Returns the rows with matching values in both tables.
- LEFT JOIN: Returns all the rows from the left table and the matching rows from the right table.
- RIGHT JOIN: Returns all the rows from the right table and the matching rows from the left table.
- FULL JOIN: Returns all the rows from both tables, including the rows that do not have matching values.
Each type of join has its own use case, and understanding when to use each can greatly enhance your ability to retrieve and analyze data efficiently.
To learn more about the JOIN statement and its different types, you can refer to the Join (SQL) Wikipedia page.
In the next section, we will discuss some practical examples of how to use the JOIN statement in SQL queries.
 Source: blog.sqlauthority.com
VII. GROUP BY Statement
The GROUP BY statement is a powerful tool in SQL that allows you to group data based on one or more columns. This can be useful for aggregating data and gaining insights from large datasets. Here are some key points to remember about the GROUP BY statement:
Grouping Data: The GROUP BY statement allows you to group rows together based on the values in one or more columns. This can be helpful for analyzing data by specific categories or criteria.
Aggregate Functions: Once you have grouped your data, you can apply aggregate functions such as SUM, AVG, MAX, MIN, and COUNT to calculate summary statistics for each group. For example, you can use the SUM function to calculate the total sales for each product category.
Filtering Grouped Data: Sometimes, you may want to filter the grouped data based on certain conditions. This is where the HAVING clause comes in. The HAVING clause allows you to specify conditions that must be met for a group to be included in the result set. For example, you can use the HAVING clause to filter out groups with a total sales value less than a certain threshold.
The GROUP BY statement is a powerful tool for analyzing and summarizing large datasets in SQL. By grouping data and applying aggregate functions, you can gain valuable insights from your data.
For more information on the GROUP BY statement, you can refer to the Wikipedia page on GROUP BY.
VIII. ORDER BY Statement
The ORDER BY statement in SQL is used to sort the query results in a specified order. It allows you to arrange the rows of a table based on the values in one or more columns. Here’s how you can use the ORDER BY statement to sort your query results:
Sorting query results using the ORDER BY statement
To sort the query results, you need to specify the column(s) on which you want to base the sorting. For example, if you have a table called “Employees” and you want to sort the records based on the “Last Name” column, you can use the following SQL statement:
SELECT * FROM EmployeesORDER BY Last_Name;In this example, the query will return all the rows from the “Employees” table, sorted in ascending order based on the values in the “Last_Name” column.
Specifying ascending or descending order
By default, the ORDER BY statement sorts the query results in ascending order. However, you can specify the sort order by using the keywords “ASC” or “DESC”.
To sort the query results in descending order, you can modify the previous example as follows:
SELECT * FROM EmployeesORDER BY Last_Name DESC;In this case, the query will return all the rows from the “Employees” table, sorted in descending order based on the values in the “Last_Name” column.
Sorting based on multiple columns
You can also sort the query results based on multiple columns. In this case, the sorting will be applied in the order specified.
For example, if you want to sort the records from the “Employees” table first by the “Last_Name” column and then by the “First_Name” column, you can use the following SQL statement:
SELECT * FROM EmployeesORDER BY Last_Name, First_Name;In this example, the query will return all the rows from the “Employees” table, sorted in ascending order based on the values in the “Last_Name” column. If two records have the same last name, they will be further sorted in ascending order based on the values in the “First_Name” column.
The ORDER BY statement is a powerful tool in SQL that allows you to control the sorting of your query results. By understanding how to use the ORDER BY statement effectively, you can manipulate the order of your data to meet your specific needs.
 Source: i.redd.it
XI. Conclusion
Review of essential SQL commands for beginners
In this guide, we have covered the essential SQL commands that every beginner needs to know. Here is a quick recap of the commands:
- SELECT: Retrieves data from a database table.
- INSERT INTO: Inserts new records into a database table.
- UPDATE: Modifies existing records in a database table.
- DELETE: Deletes records from a database table.
- CREATE TABLE: Creates a new database table.
- ALTER TABLE: Modifies the structure of an existing database table.
- DROP TABLE: Removes an existing database table.
- JOIN: Combines data from multiple tables based on a common column.
- GROUP BY: Groups rows based on a specified column to perform aggregate functions.
- ORDER BY: Sorts rows in a result set based on one or more columns.
These commands form the foundation of SQL and will help you work with databases effectively. Remember to practice and experiment with these commands to gain hands-on experience.
For more information and advanced SQL topics, you can refer to the SQL Wikipedia page or explore online tutorials and resources. Happy coding!